Continuing from part 1 where I created 3 small functions: GotoXY, HLine and VLine. I am going to create a couple more “helper” functions as well as the function that will initialize the screen and make it ready to start the game.
First I will look at the function to print a string on the screen. It is actually fairly simple. We start by finding the address in memory where the string is stored. When that is found, we print the character that is stored there, increment the address and start over until we reach a 0-byte. As the function being used (CHROUT) automatically move the cursor we do not have to think about anything other than incrementing the address and checking for 0-byte.
; **************************************************************
; PrintStr
; **************************************************************
; Description:	Write a zero-terminated PETSCII string to scr
; **************************************************************
; Inputs:	Register X = Low byte of string start address
;		Register Y = High byte of string start address
; **************************************************************
PrintStr:
	stx	TMP0		; Store string start address in
	sty	TMP1		; Zero-page memory in order to
				; do indirect addressing
	ldy	#0		; Y used as offset, start at 0
.doprint
	lda	(TMP0), Y	; Load character into reg A
	beq	.printdone	; If char=0, we are done
	jsr	CHROUT		; Print the character
	iny			; Increment offset (Y)
	jmp	.doprint	; Loop back, get next character
.printdone:
	rts
Now that we have the PrintStr function, let me show how it is called. I will create a small snippet of code to show how to use the PrintStr function. This snippet will not function correctly on its own, but if it is combined with the information found in part 1, it should be possible to assemble a .prg file that will actually run on the Commander X16.
; Load X with low-byte of .title address
	ldx	#<.title
	; Load Y with high-byte of .title address
	ldy	#>.title
	jsr	PrintStr

; Variable containing our string
.title	!pet	"x16-maze",0
The next function converts a !byte value into a 3 digit PETSCII string. As we all know, a byte can hold any value from 0 to 255 so we need 3 digits to represent any number that can be held in a byte. The function works directly on 2 global variables. A !byte called .lvl and a !pet called .lvltxt
.lvl	!byte	0
.lvltxt	!pet	"000",0
Since the .lvltxt variable is initialized with “000”, we only need to change the digits that are not 0. So if the value in .lvl is 53, we only change the 2nd and 3rd digit and leave the first 0 in place. The .lvltxt will then contain “053”. The function works, roughly this way:
if value >= 200 then
	write '2' in the first digit
	subtract 200 from the value
else if value >= 100 then
	write '1' in the first digit
	subtract 100 from the value
endif
for digit=9 downto 1
	num = digit * 10
	if value >= num then
		convert digit to petscii char
		write petscii-char in 2nd digit
		subtract num from value
		break out of for-loop
	endif
endfor
convert value to petscii char
write petscii-char in 3rd digit
In the hundred’s we check for either 200 or 100 to see if we need to change the first zero to 2 or 1. For the ten’s a loop is created that counts from 90 down to 10 and checks if we need to change the middle digit. Finally for the one’s, we simply convert the remaining value to a writable char (i.e. add $30 to the value).
; **************************************************************
; LVLtoPET
; **************************************************************
; Description:	Convert value in byte to 3-digit decimal string
; **************************************************************
; Inputs:	.lvl = Global variable containing a byte value
;		.lvltxt = Global variable containing string
; **************************************************************
LVLtoPET:
	; Local names to zero-page constant to make the code
	; a little more readable
	.value=$00
	.digit=$01
	.num=$02

	lda	.lvl	; Load Reg A with current level

	; Check if .lvl is >= 200
	cmp	#200
	bcc	.is100	; branch to .is100 if .lvl <200
	ldy	#'2'	; Write '2' to first digit of .lvltxt
	sty	.lvltxt
	sbc	#200	; Subtract 200 from .lvl
	beq	.allDone; If result = 0, we are done
	jmp	.Tens
	; Check if .lvl is >= 100
.is100:
	cmp	#100
	bcc	.Tens	; branch to .Tens if .lvl < 100
	ldy	#'1'	; Write '1' to first digit of .lvltxt
	sty	.lvltxt
	sbc	#100	; Subtract 100 from .lvl
	beq	.allDone; If result = 0, we are done
	; Check if .lvl contains any tens (10-90)
.Tens:
	ldy	#9
	sty	.digit	; Store digit in zero-page memory
	ldy	#90
	sty	.num	; Store digit*10 in zero-page memory
.DoTens
	cmp	.num
	bcc	.Any10	; branch to .Any10 if .lvl < .num

	sta	.value	; Save current value, we need the a reg
	lda	.digit
	clc		; Clear carry to ensure correct add
	adc	#$30	; Add $30 to digit to get petscii char
	sta	.lvltxt+1;Write digit to 2nd space of .lvltxt

	lda	.value	; Restore value into A register
	sec		; Set carry to ensure correct subtraction
	sbc	.num	; Subtract .num from current .value
	jmp	.Ones

.Any10	cmp	#10
	bcc	.Ones	; branch to .Ones if A < 10
	; subtract 10 from .value
	sta	.value	; Save current value
	lda	.num	; Subtract 10 from .number
	sec
	sbc	#10
	sta	.num
	lda	.value	; Restore value into A register
	dec	.digit
	jmp	.DoTens
.Ones:
	clc		; Clear carry to ensure correct add
	adc	#$30	; Add $30 to get petscii char
	sta	.lvltxt+2;Write digit to 3rd space of .lvltxt
.allDone:
	rts
This is, by far, the largest and most complicated helper-function yet. There might be a simpler way of doing it (I hope so) but I have not searched for it.
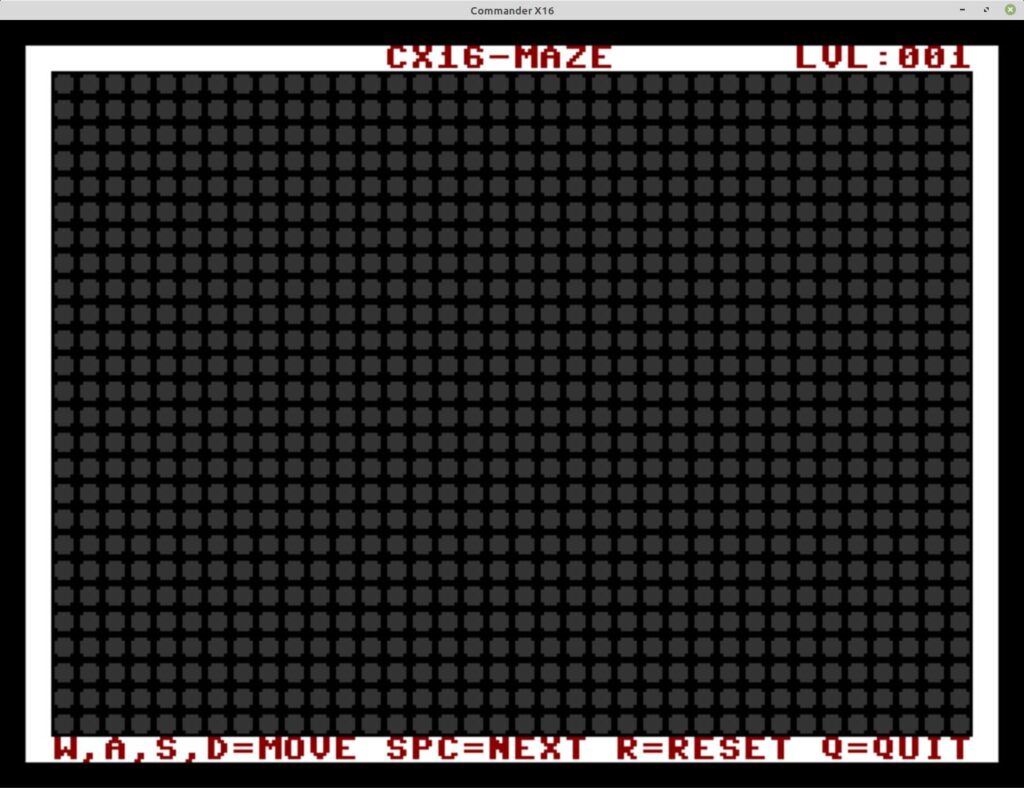
Finally we have reached a point where we can actually start to get something written to the screen. Now it is just a question of deciding how the screen should look. At the time I was designing the screen layout for the game, I was unaware that it is possible to write to the bottom right without scrolling the entire screen (See my note on Line to scroll on on the Programming Ramblings page). For this reason I am clearing the screen with a black background and creating a frame that sits 1 char in from the border all the way around. This reduces the area for the actual mazes, but there is still plenty of space for some fairly complex mazes.
The InitSCR function initializes the screen to 40×30 mode. It creates the area that will contain the mazes, level information and a bit of helpful information on how to play the game. The function depends on the following global constants.
CHROUT=$FFD2	; CHROUT outputs a character (C64 KERNAL API)
SWAPPER=$FF5F	; Switches between 80x60 and 40x30 modes
COLPORT=$0286	; This address contains foreground and
		; background colors
Wall=113	; PETSCII circle
WallCol=$0B	; Black/Darkgray
Space=' '	; Char used for spaces
NOTE: SWAPPER is now called SCRMOD and is a new KERNAL function for the CX16 instead of an old function from C128. This means that these examples are no longer working. See the CX16 Programmers reference for using SCRMOD
The following global variables are used by the function.
.lvl		!byte	1
.title		!pet	"cx16-maze",0
.helptxt	!pet	"w,a,s,d=move spc=next r=reset q=quit",0
.lvlstr		!pet	"lvl:",0
.lvltxt		!pet	"000",0
And finally for the function it self. It makes use of the helper functions that have been explained previously so this function in it self is not very complex.
; **************************************************************
; Initializes the screen
; **************************************************************
; INPUTS:	Gloabl variables
;			.lvl
;			.title
;			.helptxt
;			.lvlstr
;			.lvltxt
; **************************************************************
InitSCR:
	lda	$D9	; $D9 contains the number of
			; columns being shown
	cmp	#80	; if this is 80, we will switch to 40x30
	beq	.SetIt	; Set 40 column mode
	jmp	.NoSet
.SetIt:
	jsr	SWAPPER	; Switch screenmode
.NoSet:
	lda	#$01	; Black background, white text
	sta	COLPORT	; Set Color

	lda	#147	; ClrHome
	jsr	CHROUT	; Clear Screen
	lda	#$10	; White background, black text
	sta	COLPORT	; Set color
	ldx	#1	; Setup to create top horizontal line
	ldy	#1
	jsr	GotoXY
	lda	#Space
	ldx	#38
	jsr	HLine	; Draw horizontal line
	ldx	#28	; Setup to create bottom horizontal line
	ldy	#1
	jsr	GotoXY
	lda	#Space
	ldx	#38
	jsr	HLine	; Draw horizontal line
	ldx	#2	; Setup to create left most vertical line
	ldy	#1
	jsr	GotoXY
	lda	#Space
	ldx	#26
	jsr	VLine	; Draw left most vertical line
	ldx	#2	; Setup to create right most vertical line
	ldy	#38
	jsr	GotoXY
	lda	#Space
	ldx	#26
	jsr	VLine	; Draw right most vertical line
	lda	#$12	; Set color, white background, red text
	sta	COLPORT
	ldx	#1	; Set up for title text
	ldy	#15
	jsr	GotoXY
	ldx	#<.title; Write the title text
	ldy	#>.title
	jsr	PrintStr
	ldx	#1	; Set up for level text (top right corner)
	ldy	#31
	jsr	GotoXY
	ldx	#<.lvlstr; Write the level text
	ldy	#>.lvlstr
	jsr	PrintStr
	jsr	LVLtoPET ; Create level as a petscii string
	ldx	#<.lvltxt
	ldy	#>.lvltxt
	jsr	PrintStr
	ldy	#2	; Set up for help text (bottom line)
	ldx	#28
	jsr	GotoXY
	ldx	#<.helptxt; Write help text
	ldy	#>.helptxt
	jsr	PrintStr
	jsr	FillGA
	rts
NOTE: First line of above function is not correct. $D9 no longer contains the number of columns, instead it can be found on address $02AE. As mentioned in previous note. SWAPPER no longer exists and is now SCRMOD.
As you might have noticed, the last line before the rts is actually a call to another helper function that I have not yet described.
FillGA is a function, who’s only function is to fill the center of the screen, the area within the white border, with “wall” characters. It does this by creating horizontal lines of the “wall” character.
; **************************************************************
; Fill the "gamearea" with "wall tiles"
; **************************************************************
; INPUTS:	Global constant WallCol is used.
; **************************************************************
FillGA:
	lda	#WallCol	; Set background and foreground
	sta	COLPORT		; color

	ldx	#1		; X register holds Y coordinate

.StartOfFill:
	inx			; Increment Y coordinate
	stx	TMP0		; Save the Y coordinate in ZP
	cpx	#28		; If we have reached line 28,
	beq	.EndOfFill	; We are done, so branch to end
	ldy	#2		; Y register holds X coordinate
	jsr	GotoXY		; Place cursor at X, Y coordinates
	lda	#Wall		; Load A with 'wall' character
	ldx	#36		; Create a horizontal line that is
	jsr	HLine		; 36 characters wide
	ldx	TMP0		; Restore Y coordinate from ZP
	jmp	.StartOfFill
.EndOfFill
	rts
Now with the last helper function in place, the initial screen should look something like this:
Next up: Defining the mazes and getting them drawn on the screen and possibly getting started with some “animation”. Stay tuned for part 3.